
How To Make Sourdough No Knead Bread
March 23, 2022
Comprehensive guide to bake a simple and tasty sourdough bread at home.

This is going to be a lengthy post.
I kid you not when I say this is a comprehensive guide!
Baking Sourdough Journey
I have been on this sourdough baking journey ever since I was gifted with Peter Reinhart Bread book when I turned 40.I was a noob, and could not understand the whole process well!
And obviously, looking and calculating the wastages in making the starter really put a halt to everything.
Then, one of the big grocery shops, Woollies started baking their 'Artisan' sourdough bread.
Their sourdough was good and soon became our weekend treat.
Good things were not meant to last, their bread became pricey.
That was when my sourdough journey started!
The search for sourdough recipes on the internet began, just so that I could bake my own sourdough.
Read few more articles, watched countless video, tried and failed many times.
Picked up few pointers and few techniques here and there and finally I "think" I nailed it.

What is Sourdough?
Sourdough is a naturally leavened bread that does not use commercial yeast.It uses a 'starter' that is made of equal weight of flour and water.
Fermentation process will take place, using the 'natural' occurring yeast and wild lactobacillaceae.
Keeping them at room temperature, these organism will produce lactic acid that will naturally makes the dough has a hint of sourness to it.
Equipment used in baking this sourdough
Minimal equipment were used to bake this sourdough bread.Since this is a no knead bread, you can put aside your Kenwood or Kitchen Aid!
These are what I used:
1. Kitchen scale - a must in sourdough baking.
2. Mixing bowls
3. Dough scrapers
4. Round Banetton basket
5. Dutch Oven
6. Bread lame

Sourdough starter
My first sourdough starter was a failure.
I was clueless when I started mine.
Perhaps did not understand the whole process, and seeing a lot of wastages, I had no choice but to step back a while.
My second starter miraculously survived till today (since 2020).
Yes, my starter has a name!
It is called Fred Friday.
This is my sourdough starter recipe.

1. 30g high protein flour or bread flour.

2. 30g filtered water

3. 30g starter or mother starter.
I followed King Arthur Baking sourdough starter!
But I reduced the amount of flour to water ratio to a 30g: 30g ratio.
I kept my sourdough starter in the fridge at all time unless I plan to bake for the week.
How often do I need to feed the sourdough starter?
I feed my sourdough starter every week, or at least I tried to, at sometimes I forget and fed them after a month.The organism were still alive (perhaps barely alive!!) with some liquid forming above the starter.
This liquid is known as Hooch.
The colours may vary from clear to grey to even black in colour!
Remove hooch, and the top layer of starter.
Feed the starter with fresh flour and water, and they are good to go.
Ingredients to make Sourdough?
Main ingredients to bake sourdough are bread flour or high protein flour (with at least 12% protein content), water , salt and starter.This is only for basic sourdough baking.
You can mix rye flour or wheat flour or even grains to this basic sourdough.

Formula for sourdough bread baking
Going by percentage of bread flour is the easiest way for me to remember how much each and every ingredients must be.This is my magic sourdough bread recipe.
Formula:
Bread flour or high protein flour 100%Hydration (water) 70%
Salt 2%
Starter 20%
For example:
I used 300g bread flour!
Then my water will be 210g
6g salt (I like my bread to be a little bit on the saltier side and I usually used 7g salt)
Starter will be 60g.
By remembering the formula, I can bake any size of sourdough at any time!
Do note: if you are not comfortable with 70% hydration, then start with 65% first until you are confident on handling 70% hydration bread.
How to bake sourdough!
Printable sourdough recipe is at the end of this post.I will take you through step by step in sourdough bread baking with these photos.
Sourdough starter.
I will take my starter that has been staying dormant from the fridge and feed them once a day for three days, using the ratio as stated above.When I plan to bake, I will start the day early by mixing my starter first.
This whole process of sourdough baking can be a whole day affair.

How to make active sourdough starter?
Remove starter from the fridge, and set aside for at least 2 hours.Mix 30g bread flour with 30g filtered water and 30g starter from the fridge.
Discard the remaining starter.
Sourdough discard can be used to bake this rosemary crackers!
Repeat the above for 3 days.
Do not refrigerate!
On the fourth day, I would feed my starter early in the morning and hope that they will triple in size by the afternoon.
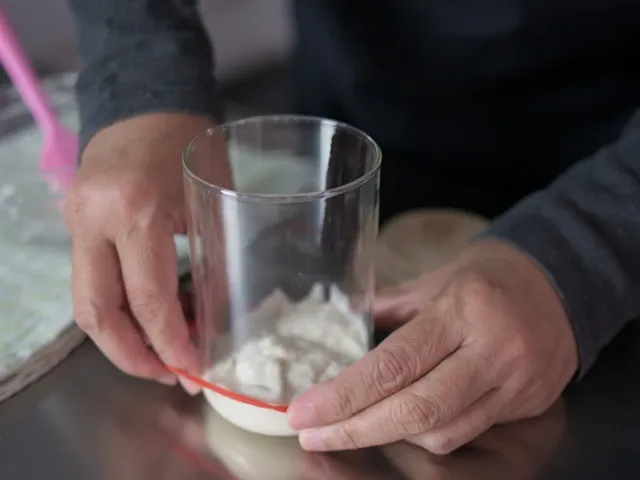
1. Place an elastic band or make a marker on the bottle.
Leave the starter to bloom.
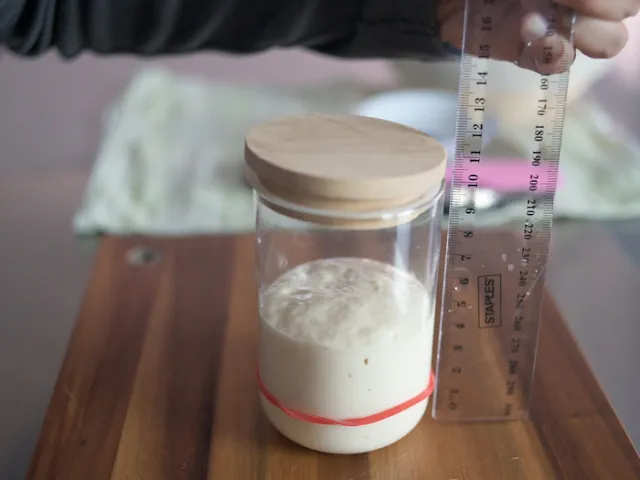
2. Bread starter nearly tripled its initial height.
The time for starter to rise (to triple its height) very much depending on the room temperature.
Summer may take about 3 hours and winter days may take as long as 5 to 7 hours.
Once the starter has reached two and half of its initial height, it's time to start mixing the sourdough dough.
Sourdough dough

1. Hydrate the flour by mixing with water, into a shaggy or rough dough.

2. Leave for at least 30 minutes for the dough to go through a process call Autolyse.
Resting the dough at this stage will let the gluten relax and bind together, hence it is easier to knead.

a) Active sour dough starter

b) Add starter to dough

c) Mix by pinching in method
3. Mix in the active sourdough starter by pinching in method.
Careful not 'tear' the gluten that was formed during the autolyse stage.
Rest again.


4. Add in salt using the same pinching in method.
Salt will make the gluten stronger as well as to flavour the bread.
Let the dough rest again for at least 30 minutes.
Why salt was not added at earlier stage in sourdough bread baking?
Salt will slow down the yeast growth and reproduction of yeast in our bread!Hence always add salt last in sourdough baking.
Stretch and fold bread dough.
Spray some water to your fingers, pinch one corner of the dough, stretch and fold onto the centre.Do as per video.


Cover and leave the dough to rest for 30 minutes in between the stretch and fold.
These steps are a must, to produce stronger gluten.
Repeat this step 3 times until the dough is smooth and very stretchable.
Coil and Fold sourdough dough
You are ready for the next stage of sourdough bread baking.

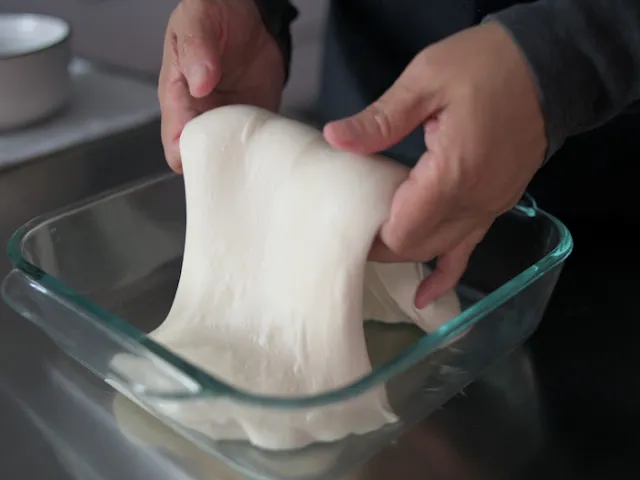
Spray some oil onto a square glass container (I used Pyrex) and transfer the dough.
Note: I sometimes forget, by using this Pyrex with handle, I will know the which way to rotate and what I did few seconds ago!
Cover and leave it to rest for 15 minutes.
1. First set of Coil and Fold
At this stage the dough will spread itself in the glass container.Wet your fingers and lift up the dough by the mid section and coil or fold the dough onto itself.
(Watch the video to have a better understanding)
a) Rotate the glass 180 degree and repeat.

b) Then rotate 90 degree repeat coil and fold.
c) And the rotate 180 degree and do the last coil and fold for the first round.

d) Pop any air bubbles on the dough

e) Cover and leave the dough to rest for 30 to 45 minutes.
Keep your eye on the dough.
In hot kitchen, the dough may be ready at 30 minutes or in winter it may take as long as 45 minutes!
2. Repeat second and third Coil and Fold
Remember that a complete Coil and Fold, consists of 3 bowl rotations (180 degrees, 90 degrees, 180 degrees)Cover and leave to rest after every Coil and Fold.
What happen to the dough during this Coil and Fold stage?
Watch the dough closely, after resting and before, for every coil and fold.


Initial stage, the sourdough dough will spread almost to the edge of the bowl.
Take note before the second coil and fold, as the gluten in the dough develop, it does not spread as much.
Gluten has gain more strength after the third 'Coil and fold', thus will be ready for the next stage.
You could see a slight curvature and dough hold its shape better.
Dust banetton with rice flour.

Why use rice flour for dusting sourdough banetton?
Rice flour is gluten free and will not absorb any moisture from the dough.Furthermore, rice flour will give the sourdough bread a nice crunch once the bread is baked.
Last and long fermentation stage

Sprinkle bread flour on top of the dough and work space.

Tip over the dough from the square pyrex container onto the kitchen worktop.
Relax the gluten for 15 minutes.

Using bread scraper, gently stretch each side of the dough to form a square shape.
Fold the left side of the dough 2/3 towards the right.
Repeat for the left side of the dough, fold 1/3 towards the right and on top.

Take hold of the shorter end of the dough and roll towards you.


Stitch the seam and sides.
If you are using an oblong banetton, transfer to the banetton (bread basket) with seam side up.
And if you are using round banetton, gently try to shape as a ball by rolling on its seam.
This will create extra tension in the dough.

Transfer to banetton, seam side up and sprinkle more rice flour.

Place sourdough in a food grade plastic bag, seal or tie the open end.
Let the dough rest for 30 minutes, then transfer to refrigerator.
What if I do not have a banetton?
You can use a bowl and line with kitchen towel.Make sure to dust the kitchen towel with rice flour.
How long to cold retard sourdough?
I usually keep my sourdough refrigerated for at least 18 hours.Why do we need to cold retard?
Cold retard or cold fermentation stage is to slow down yeast development hence bread will rise at a very slow rate.Allowing the dough to rest in banetton under cold environment will enhance the taste better.
The sour bread will taste more tangy after a long cold fermentation stage.
I have experimented by putting my sourdough in the fridge for 36 hours, the bread tasted better than my 18 hours sourdough bread.
How long to bake sourdough?
Preheat the oven together with the dutch oven in it.I pre heated my oven for 30 minutes prior.

I then, gently flipped my sourdough, straight from the fridge, onto baking paper (I had a plate or loose baking pan bottom underneath for stability and easier to handle).
Transfer to piping hot dutch oven.

Score the sourdough bread at a 45 angle.
Score deep, about 1 cm or half an inch deep.
Alternative, score the bread then transfer to dutch oven.
Cover and bake 25 minutes.

After 25 minutes, remove cover and continue baking for another 20 minutes or until the sourdough bread turn to rich brown colour, the perfect loaf all time!
You will know when your sourdough bread is done baking in the oven, when you hear a hollow sound when you tap the bread.

Leave the sourdough to cool down for an hour before slicing.
How to keep sourdough?
Always keep bread in an airtight container all the time.Other recipes.
Rosemary seasalt crackers using sourdough starter discardCinnamon buns
Pretzels
Video on "How To Bake a Sourdough"

I really appreciate this post of yours. Thank you for sharing. I have a few questions for if you don't mind. I live in Victoria which is cold 6 months in a year. If my starter takes 5-7 hours to peak, is it still considered 'active' enough to bake SD bread with? What bread flour do you use in Australia? The bread flour available in the supermarkets doesn't have a high enough protein content. When you say to refresh your starter 3 times before baking, do you refresh it over 3 days (meaning feed once a day for 3 days)? Thank you in anticipation.
ReplyDeleteHiya,
DeleteThank you for dropping by :).
1. Bread flour ~ I either use Millers (from WA) or Defiance White Bakers flour. Both has 12% protein.
2. Yes to feed once a day for 3 days.
3. Number of hours is just indicative.
I would consider active starter when it has tripled (at least 2.5 times) its original height.
I have baked sourdough in winter (fortunately Perth is not that cold).
If starter takes longer, then I'd feed just before going to bed and hopefully, it will be ready the next day.
Get to know how your starter would behave at certain room temperature, then you can plan better :)
All the best to your sourdough journey.
Cheers